Sunday, August 2, 2020

Trying out the Dart Analysis Server

I wanted to see how the Dart Analysis Server was put together and worked. I started looking to see how I could wire it up and try out the code reporting functionality. I went to the source but found there wasn't much to go on. But then I found a super easy way to try it out, and I'll get to that shortly. 

Usage Options

There are few methods in which the Dart Analyzer can be used. The first method being the CLI where you can provide the dart analyzer with arguments. The second method being where you could directly use the analyzer source code logically in your application like the dartdoc application does. The third method being where you can run the Dart Analysis Server where the analyzer is run as a service. It's the service that I'm interested in. 

Server Package

I started by going to the source, the Analysis Server package hoping I could find an easy execution method. I also found the api reference for it. But since this tool isn't used by many, there wasn't much to go on. I could reverse engineer the ./bin/server.dart execution, but I didn't want to spend time on that yet, hoping for an easier solution. 

SDK Packages

That's when I noticed the Dart SDK packages. And low and behold, there was a packaged named analysis_server_client. And the best part, I found it had example.dart code. 

Dart Analysis Server Client

I didn't realize it yet, but when I found example.dart I struck gold. This example provides a perfect example of how to wire up the Dart Analysis Server, add subscriptions and listen to the responses.

Trying Out the Dart Analysis Server

With three easy steps, I had the client connected to the Dart Analysis Server. 

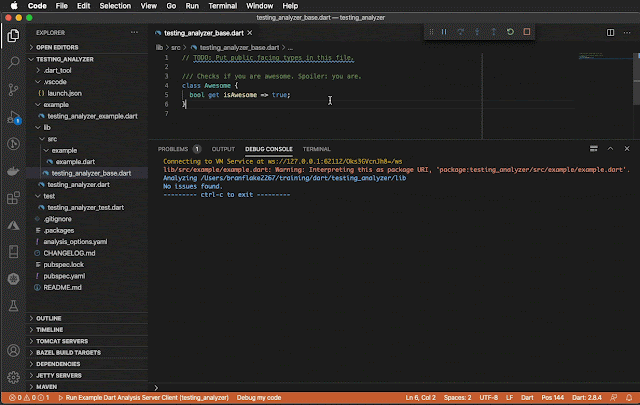
The example.dart could be run from command line but I wanted to run it from Visual Studio Code. So in this example I started the process form Visual Studio Code which allows me to break point in the process.
  1. I copied the example.dart to my dart project lib directory. 
  2. I added `analysis_server_client: any` to my pubsec.yaml dependencies and ran `pub get`.
  3. I added a Visual Studio Code Launcher to run the example.dart process on the ./lib directory.
    
    // Visual Studio Code Launchers Configs
    // Project file: ./.vscode/launch.json
    {
      "version": "0.2.0",
      "configurations": [
        {
          "name": "Run Example Dart Analysis Server Client",
          "program": "lib/src/example/example.dart",
          "request": "launch",
          "type": "dart",
          "args": [
            "./lib"
          ]
        }
      ]
    }
    

See it in Action

With the three steps done above, I run the process listening for changing in the ./lib directory. I change the values and save them and soon after the save a report on the modifications is reported in the console output. 

Saturday, July 25, 2020

Building your Flutter App on Travis CI

It is simple to configure Travis CI Building your Flutter Application on Travis CI. All you have to do is add a build manifest file named .travis.yml which includes the build server instructions. 


Travis CI Yaml Configuration
See Travis CI yaml reference for more options. In the .travis.yml build instructions 3 steps are needed to build a flutter application. 
  1. Use a dart Docker container, "language: dart"
  2. Download Flutter, "git clone ..."
  3. Export the Flutter binary path, "export PATH..."
Example .travis.yml configuration
In this example flutter beta branch is used along with the web configuration.

# File: .travis.yml
# Reference: https://docs.travis-ci.com/user/languages/dart/
language: dart
dart:
  - stable

install:
  # https://flutter.dev/docs/get-started/web
  - echo "Configure Flutter"
  - git clone https://github.com/flutter/flutter.git -b beta
  - export PATH="$PATH:`pwd`/flutter/bin"
  - flutter upgrade
  - flutter config --enable-web
  - flutter doctor

script:
  - flutter build web

  
Example Project
Check out an example project config here which uses Travis CI to build the Flutter web app. 

Saturday, July 18, 2020

Build a simple Flutter loading animation

In this example the Flutter animation controller is used to count between zero and three. The IntTween class is bound to the animated controller so the count up or down based on the the animation direction. Then the animation count is used to display the periods in the loading display. 


Configure the Animation Counter
The animation controller is easy to configure. 

1. Add the mixin SingleTickerProviderStateMixin

class _LoadingState extends State<Loading%gt; 
	with SingleTickerProviderStateMixin { //... }
  
2. Initialize the animation controller and counter
@override
void initState() {
  super.initState();
  _controller =
      AnimationController(vsync: this, duration: Duration(seconds: 1));
  _animation = IntTween(begin: 0, end: totalPeriodCount).animate(_controller)
    ..addStatusListener((state) {
      if (state == AnimationStatus.completed) {
        // NOTE: Change the animation counter direction
        _controller.reverse();
      } else if (state == AnimationStatus.dismissed) {
        // NOTE: Change the animation counter direction
        _controller.forward();
      }
    })
    ..addListener(() {
      // NOTE: Update the view
      setState(() {});
    });
  _controller.forward();
}
  
Controlling the Animation Notes:
  • Use _controller.reverse() to reverse the animation counter. 
  • Use _controller.forward() to advance the animation counter. 
  • And be sure to update the views state using setState((){}) so the view is updated.

3. Use the animation counter. Use _animation.value to reference the value for displays frame. 

int visiblePeriodCount = totalPeriodCount - _animation.value;
  
4. Tear down the animation controller
@override
void dispose() {
  _controller.dispose();
  super.dispose();
}

Try it out
Putting it all together, try out this animation example in the DartPad:


Overall 
This example shows how easy it is to use the animations in Flutter. The simplicity the Flutter animation controller makes it easy to build beautiful application animations that bring a lot of joy to application usage. 

I hope you enjoyed this small tutorial. I'd love to hear what you used the animation controller. Please share your tips and tricks below. 

Tuesday, July 7, 2020

Generating a Site for Documentation

Have you been looking for an easy way to generate a site for documentation? Where you don't have to do all the web foundation work to make it look and work great. I found Hugo to be an awesome tool to do just that. 

What is Hugo?
"Hugo is one of the most popular open-source static site generators. With its amazing speed and flexibility, Hugo makes building websites fun again."

Demo
Features
  • Really fast build times
  • Multi-language support, multilingual and i18n
  • Markdown support with shortcodes
  • Flexible content management system (CMS)
  • Hundreds of themes to choose from
  • More...
Generate and Run a Docsy Site

1. Install
2. Download
Download the Docsy example. Git is used to download the example.
git clone --recurse-submodules --depth 1 https://github.com/google/docsy-example.git
3. Run the Web Server
    
cd docsy-example
hugo server 
    
    
4. Load the Docsy Site

The link will be in the output and will look like http://localhost:1313. 

Hugo
Find out more about what Hugo can do for your site.

Sunday, June 28, 2020

Set up and Debug using a Tomcat Web Server and Eclipse IDE

Have you been looking to debug and run your web app in a Tomcat web server in Eclipse so you can set break points and inspect the call stack? You've come to the right guide. This guide will cover setting up a Tomcat web server in Eclipse. 

Download Eclipse IDE 
When working with the Eclipse Web Standard Tools (WST), I recommend downloading the latest Enterprise version. 

Note: If you're an expert, you can install the plugins separately. If you have an existing Eclipse and projects config, I find it's much easier to download a new version of Eclipse. And open back up the previous workspace. 

The Eclipse installer, choose the 'Eclipse IDE for Enterprise Java Developers'.  


Download Apache Tomcat
Download the latest Apache Tomcat, which means you download the web server code that can runs the Apache Tomcat web server. 

  1. Download the latest Apache Tomcat. Go to the downloads, then choose the core zip. 
  2. Unzip the core zip into a memorable directory. For example ~/servers/tomcat/apache-tomcat-x.x.xx.


Install the Tomcat Server
The goal is to add the Server in the Eclipse Servers list. And then it can be used to add a project to it. 

1. Open Eclipse
2. Go to the Debug Perspective. Window Menu > Open Perspective > Debug
3. Click on the 'Servers' view or looks like a tab. 
4. Click on the 'No servers are available...', this will open the 'Define a New Server' dialog. 
5. Filter the server type, 'tomcat'. 
6. Select the Tomcat server version you downloaded earlier. I selected Tomcat v9.0 Server.
7. Clicking next will bring you to the Tomcat Installation directory choice. Choose the install directory. This directory points to the unzipped files that were downloaded earlier. For example select ~/servers/tomcat/apache-tomcat-x.x.xx. Select next.
8. Add and Remove, this will allow you to add your WST web app. This can be done later too.
9. Click finish, and you have a new Tomcat Server to use with web app debugging.


Debugging
Once the server has been added, you can add your project with a web app folder to the server.  The applications web app can be added during server install or after. 

1. After the server is added, right click on server and click Add and Remove...
2. Select your project and add it to the server. 

Example of Installing the server and adding your project to it. Then running the server in debug mode. 


Saturday, June 27, 2020

Editing and Debugging Java Applications

This article covers editing Java with Visual Studio Code and Eclipse.


Editing and Debugging with Visual Studio Code

Visual Studio Java Support
VS Code doesn't come with Java support by default. The features have to be installed via extensions.


Editing and Building a Java Web App 


Editing and Debugging with Eclipse 

Eclipse Java Support

 
Editing and Building a Java Web App


Debugging a Java Web App in Visual Studio Code

This guide will cover debugging your Java web app in Visual Studio Code (VS Code) using an Apache Tomcat web server to debug the project. 

Rewind - Create a Java Project First
If you missed the Create a Java Project in VS Code, check it out first. 

Download Apache Tomcat
Download the latest Apache Tomcat, which means you download the web server code that can runs the Apache Tomcat web server. 
  1. Download the latest Apache Tomcat. Go to the downloads, then choose the core zip. 
  2. Unzip the core zip into a memorable directory. For example ~/servers/tomcat/apache-tomcat-x.x.xx.


Install The Visual Studio Extension
Two extensions are required to debug your Java application in Visual Studio Code. 
  1. Install the Java Extensions Pack 
  2. Install the Tomcat for Java Extension 

Install the Tomcat Web Server
The goal is to install the Tomcat web server in Visual Studio Code so it can run the web application in debugging mode. 
  1. Go to the File Explorer View
  2. Expand the 'Tomcat Servers' panel
  3. Hover over the panel and then click on the Add + button. 
  4. Select the Apache Tomcat servers files directory where the tomcat files were unzipped. For example ~/servers/tomcat/apache-tomcat-x.x.xx. 
  5. Once you select the server, it will be added to the servers list. The server shows a red square which means it's not running. 
Tomcat Server Settings
  1. Right click on the Tomcat server (apache-tomcat-9.0.36). 
  2. Select Open Server Configuration or Customize JVM Options. 
Once you open the server configuration, you can change the admin port and the connectors virtual host port. Other things like authentication could be adjusted on the server level here too.

Here's what the server configuration, server.xml looks like. 

Debug your Web App
Find your webapp directory. The webapp directory must contain the static resources to load the webapp. It must also container the server instructions in the WEB-INF/web.xml file and compiled resources in the WEB-INF/classes directory. 
  1. Be sure the classes have been compiled to the WEB-INF/classes folder. This depends on the Java architecture used. 
  2. Right click on the web app resources folder and select 'Debug on Tomcat Server'. 
  3. Wait for the debugging process to start and load the browser, for example open http:localhost:8080
 Java Folder Architecture  Typical Webapp Directory Build
 Standard Java Webapp Directory  ./webapp or ./webcontent  On Save / Or Java Project Reset
 Maven Webapp Directory  ./target/[project-name or defined pom.xml]  Run: mvn compile war:exploded

Making Update
Hot reload your changes.

1. Make a change in the Java class or Servlet class. 
2. Hit the lightning debugger button to hot reload your class. This will copy the change to the Tomcat web app classes directory. 
3. Reload your changes in the browser. 

Video Tutorial
See the debugging in action in this video.


Issues
Common issues that might show up at some point. 

Corrupted or Missing Jar Files
Delete the Tomcat web app directory and right click and re-run the tomcat server. This will copy the files to the Tomcat web app directory again. 
  1. When you right click and run 'Debug on Tomcat Server' will erase the directory and run it again. 
  2. You can do it manually delete the Tomcat web app directory. Expand the tomcat server and right click on the web application. 
  3. On slow systems, don't hit 'Debug on Tomcat Server' more than once. Wait for the first process to start. 


Class Not Found Problems
  1. In large projects on slow systems, it takes a while to compile the classes. This happens each time VS Code is started. Wait until the classes are finished compiling before running the server. 
  2. Or Use (shift + ctrl + p) or (shift + command + p) to open up the commands menu. Filter by Java and find the reset task. Run a reset to start a new compile. 
  3. Or manually delete the WEB-INF/classes directory and restart VS Code to restart a Java compile. Make sure the classes are copied to the Tomcat web app directory before. 


Trying out the Dart Analysis Server

I wanted to see how the Dart Analysis Server was put together and worked. I started looking to see how I could wire it up and try out the co...